Showing posts with label Miniatures. Show all posts

Thursday, December 9, 2010

Frida Munny. On auction for a Good Cause!

Check out my Munny Frida Kahlo! I made her for a charity auction that benefits NLGSF, my day job. It is sponsored by Galeria de La Raza. You don't know about what a Munny is? They are fantastic art collectible toys by Kid Robot. Many artists have designed these toys, I'm glad I gave it a shot, this is my first one. Check out another Munny toy designed by the very talented Carlos Villez. He was inspired by "El Catrin", from the Mexican Loteria board game. He seems to be courting Munny Frida...But she is playing hard to get!

There are many more amazing items up for auction! If you are in San Francisco, go check it out! The NLGSF Holiday Party and Auction will be held tomorrow, Friday December 10 at the Cartoon Art Museum in San Francisco, at 6:00 pm.

The Cartoon Art Museum is located at 655 Mission Street between New Montgomery and Third Streets, is around the corner from the San Francisco Museum of Modern Art and a dozen other museums which comprise the Yerba Buena Gardens cultural district of San Francisco’s South of Market area.

Friday, November 26, 2010

New Holiday Mural - Sweaters and Raindeer

Galeria de la Raza in San Francisco has a one of its kind program that allows artists to create large scale digital murals. Check out the digital mural archive here! This season I'm honored to create a holiday mural for Galeria.


Here's a sketch I came up with. The deer is a traditional animal for the season. For the Yaqui people, it is actually a sacred animal. Reindeer will be the central element for my mural. The sweater the deer is wearing is inspired by the popular textiles created in Chiconcuac, in central Mexico.


According to MexChic on Etsy: "Marilyn Monroe in the 60’s and Starsky & Hutch in the 70’s made these sweaters famous in the United States, but they’ve always been a staple in Mexico."

More to follow. In the mean time, keep warm!

Tuesday, November 17, 2009

Charity Fundraiser, Faux Gingerbread & Dark Fairy Tales


We all know the tale; and evil witch lures innocent children using candy, in order to eat them. According to Anke A. Culver, a retired professor of Loyola University, the witch is the one that got a bad rap. The witch’s name was Katharina Schraderin, a talented baker from Southern Germany in the 1600’s. A baker named Hans Metzler tried courting Katharina in order to steal her recipes. After being rejected he accused her of practicing witchcraft. Katharina is found innocent, but the greedy Hans and his sister Grete end up breaking into her house. They ruthlessly kill Katharina and burn her remains in one of her ovens. Talk about killing the competition!


I created this shadowbox house out of wood and a variety of media. It is being auctioned for Galeria de la Raza's annual fundraiser, on Saturday, November 21st. The lightbox is shaped like a gingerbread house, complete with a bedroom, a bathroom, a living room, a walk-in closet, a kitchen and a porch. Two little characters seem to live inside, will they live happy ever after? The title of the piece is "La Casita/My Little Foreclosure".


These days seems like people are loosing their little piece of the American dream, for a variety of reasons. What, or who is to blame? Immigrants? Banks? People that got loans they couldn’t pay? Could it be illness, a divorce, a death in the family, the loss of a job? Are the victims, once again, being blamed?


Please support Galeria de la Raza’s Pachanga! Visit the on-line catalog for more information and suggested starting bids. Bidding by proxy is allowed and encouraged.

Visit Cookie Cutter Research, to read more about the story behind the tale of Hansel and Gretel, as told by professor Culver. The website also has a great on-line database of cookie cutters, as well as everything related to cookies.

Friday, October 30, 2009

Cajitas: Great Workshop!

On Saturday, October 24th I lead a Day of the Dead workshop at Galeria de la Raza. I provided participants with small postcard sized wooden boxes and a variety of embellishments that included plaster miniatures, specialty papers and other collage elements.

It was really a joy seeing friends and families working together!

Everyone was working so hard...But it seems like they were also having a good time

The themes of the boxes varied from traditional Day of the Dead designs to personal dedications to family members to a fantastic box with an environmental theme, in honor of our dying planet. Thanks everyone for participating!


And thank you Galeria de la Raza! Click the link to visit Galeria's calendar of events

Monday, September 28, 2009

Cajitas: Day of the Dead Boxes Class at Galeria!

On Saturday, October 24th, I will be teaching a class on how to decorate your very own mini Day of the Dead box! The class takes place at Galeria de la Raza, from 2:00 to 5:00 pm. Make sure you call Galeria ahead of time to reserve your spot.

Description:
Create a memento, a shrine, a love token for the dearly departed, or just a funny vignette in a Day of the Dead theme. Using a small wooden box and a variety of collage materials you'll create a fantastic mini treasure to take home.

Fee and materials:
$30 per person. Includes a 5x7 wooden box. Also included are unpainted plaster skulls, hearts, angels and other ornamental embellishments ready for you to paint. Lots of collage images too! I will teach you how to make lacy miniature "papel picado" and mini paper flowers. No previous art experience is necessary. Feel free to bring photos or your own personal ephemera to embellish your box.

Registration/Location:
Please call Galeria to reserve your spot. Class is limited to 12 participants. Children with an adult assistant are welcome to participate. The class will be conducted bilingually, in English and Spanish.


Cajitas: Mini Day of the Dead Boxes

Saturday, October 24th, 2009

2:00 - 5:00 pm

Galeria de la Raza
2857 24th Street
San Francisco CA 94110
Phone: 415-826-8009
Email: info@galeriadelaraza.org

By BART: Take the BART train to the 24th Street Station. You will emerge on Mission Street and 24th Street. Go East on Mission Street. Walk for about 15 minutes until you arrive at 2857 at the corner of Bryant. You can also catch the Eastbound 48 bus at the corner of 24th and Mission; get off at the corner of Bryant Street.

By MUNI: Take the 14 Line or the 49 Line to 24th Street. Exit and go Eastbound on Mission Street. You can then catch the Eastbound 48 bus at the corner of 24th and Mission and ride it to Bryant Street. You can also walk for about 15 minutes until you arrive at Bryant Street.

Sunday, June 14, 2009

Dia de las Mulitas: Making a Corn Husk Mule


Do you need a little affordable favor for a Mexican themed party? Even if you have no crafting experience you can make one of these little corn husk mules! Traditionally these mules are made out of dry palm leaves, but here I'm using corn husks, widely available at Hispanic markets. You could also use stiff crepe paper, if you can't find corn husks. These little mules are easy enough for kids to make with adult supervision, the design can be adapted to create other animals. Scroll down for instructions.


The tradition:
I remember street vendors selling dozens of little mules in a variety of sizes around June the 11th, while I was growing up in Mexico City. The origin of the "Day of the Mules" tradition is obscure. I heard it originated when church goers saw a mule kneel down during mass. The believers were amused so they decided to remember mules on the Thursday before the feast of Corpus Christi.

Villagers would also bring their wares to the city on the back of mules, in order to celebrate this feast and sell their merchandise, so maybe that is how the celebration ended up being associated with these animals.

I believe there could also be an older pre-hispanic tradition having to do with the summer harvest but I haven't been able to find much information. Whatever the reason, I think it is a charming tradition to keep alive. To make your "mulitas" you'll need the following materials:

  • One bag of dry corn husks, traditionally used to make tamales
  • Several strands of raffia
  • Embroidery floss
  • Sticky glue (I use Eileen's)
  • Match sticks
  • Scissors
  • Miniature embellishments (mini pots, dry flowers, beads, glitter, etc.)
Instructions:
Start by soaking the corn husks in water for about 30 minutes until they become soft and pliable. For mule that is about 3 inches tall you'll need two to three husks

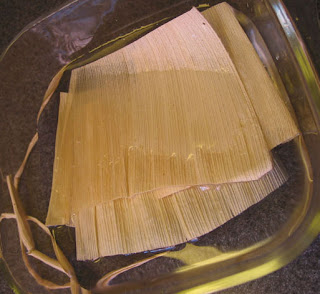
Once the husks are soft, dry them with a towel. Trim the pointy ends with scissors. Start by rolling one husk in order to create a cylinder as thick as a pencil or a drinking straw. Corn husks have veins. It is easier to roll the husks in the direction of the veins, not against them.

Once your husk is rolled tie one end with the embroidery floss in order to create a snout. Trim with scissors. Bend the end of the cylinder to create a head.


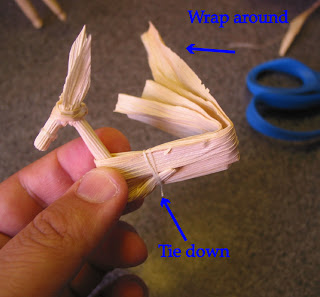
Cut a piece of husk and fold it under the head you just created. Pull the ends up in order to create the mule's ears.
Tie the "ears" together with a piece of raffia. This will create the mule's face and will keep everything in place.

Tie the raffia tightly behind the head, them trim the ends. Secure the knot with a little bit of glue. Trim the ears with your scissors and make them pointy.


Take another husk and wrap it around the neck of your mule. Tuck the rest of the neck under the body you just created.

Securely tie down the mule's body and neck. Wrap the rest of the husk around to the front of the body.

Wrap everything together tightly and tie once again. If necessary add more leaves to bulk up the body.
Cover a match stick with sticky glue and wrap around the end of it with a piece of corn husk. Tie one of the ends to crate "hoofs". Do this four times.

Add a dot of glue to an end of the match and stick it to the body of the mule, to create the legs. If necessary sharpen the match sticks a little bit with an x-acto knife. Don't forget to supervise kids and keep them away from sharp objects.

Repeat the process with all the legs. Stand your mule up and pose it to your liking. You can manipulate the legs while the glue is still wet.
Take small pieces of corn husk and raffia and wrap them around the neck and extremities in order to strengthen the pieces if necessary. You can also create a tail with raffia if you want. You now have a basic mule ready to decorate!

The miniature basket and shovel come from "Create-a- Mission", suppliers of school project materials. The mini pottery is from Mexico, but you can easily create some with self-hardening clay available at craft stores. I also use yarn and fabric scraps to create mini saddles, and match sticks to make a crate. Have fun creating your mules!

Friday, May 15, 2009

Santeria Inspired Mini Flower Arrangement


Flower arrangements doesn't have to be big in order to be decorative, meaningful and cool. I created this little flower arrangement and "shrine" of sorts for my bathroom using just a few flowers and other unusual elements. You can use materials you already have at home and a handful of flowers in order to economize.

Arrangements for your bathroom can be made in a variety of themes: A sunken ship, a beach vacation or a favorite movie (pirates, jaws anyone?). I was loosely inspired by the Santeria belief of "Orishas", or spirits of nature, in this case Yemaja/Olokun. Yemaja is the female aspect of the ocean, she is the great mother and giver of life. Olokun is the male aspect, the mysterious bottom of the ocean - very powerful and at times deadly. To make a similar arrangement you'll need the following materials:

  • A glass or ceramic tray. I'm using a recycled bottle glass tray I got in Mexico City.
  • Smooth pebbles, stones or aquarium gravel
  • Shells, coral, driftwood or any other ocean elements.
  • Flowers, seed pods, twigs, etc.
  • Figurines, folk art or aquarium decorations

I chose a big "pin cushion" flower as my focal point. It reminded me of anemones and other sea life. I cut the flower's stem fairly short and secured it inside a water container using a few stones. I placed the container on one side of the glass tray and gathered a few shells around the container in order to anchor it. I added a few more flowers and fern spirals to create balance.


On the other side of the glass tray I placed a miniature folk art mermaid from Mexico. The mini Poseidon porcelain charm comes from Castle in the Air. I surrounded the figurines with abalone chips and miniature shells. Finally I placed the tray on a shelf in my bathroom. If you don't have space on a shelf you can make a smaller version for a windowsill or even the top of your sink. Have fun!


Sunday, April 12, 2009

Little chicks

I created this little guys for the Spring bazaar at Galeria de la Raza. Have a great Spring everyone!

Monday, February 23, 2009

Mini meat


I created these cruelty-free cuts of meat out of polymer clay. A wonderful repeat client (thanks Liz) comissioned a shrine to honor her father, a butcher by trade. The ham, bacon, ribs, sausage and other mini meat products (and the butcher's block) will eventually reside inside the shrine. I hope she likes the finished piece!


Friday, January 23, 2009

Ekeko's fair of prosperity!


This image is from a storefront on Mission Street, San Francisco. This little fellow may look like an Andean merchant wearing his traditional hat and carrying sacks of grain to market. It is hard to tell from the picture but he also carries a bunch of bills. He is actually the god of abundance and prosperity named Ekeko (I've also seen it spelled "Equeco").

Ekeko has a wide smile, doesn't he? According to lore, you are supposed to place a lit cigarette inside his mouth as an offering on certain days. Smoking makes Ekeko happy and he'll grant you prosperity and wishes - but only if he smokes it all the way trough, without the cigarette going off. Ekekos are seen in Peru, Bolivia and some places in Argentina. There is actually a big fair (La Feria de las Alacitas) in La Paz, on January the 24th. At this fair you can buy Ekko figurines and the miniature items he carries - clothing, food, grain, colorful fabric and other goods. These miniatures serve as representations of the things one wishes Ekeko to bring, in order to have an abundant and lush life.

There is one caveat: You have to rely on the generosity of others in order to have an Ekeko figurine. You can't buy a figurine for yourself, it would be tremendously unlucky. Someone needs to give you the Ekeko as a gift in order for his magic to be effective. With this economy being what it is I hope someone gets one for me! I think Ekekos are charming works of folk art. They are also a South American reminder that even the prosperous have to rely on other people.

Thursday, January 8, 2009

Speaking of enchiladas....


"A proposito de enchiladas" (speaking of enchiladas) is a saying my father uses. It means you are changing the subject bluntly. So, speaking of holy enchiladas, I created these little "bite size" enchiladas as proxy food offerings for miniature altars. And why miniature enchiladas? Well, they are not for eating, but they are eye candy. I made them for last year's Fruitvale Day of the Dead Festival.