Thursday, January 21, 2010

Inspiration: Fruit Display at Bazaar Sabado


The picture above comes from a 1970's magazine. It is a photo of "Fonda San Angel", at the courtyard at Bazaar Sabado in Mexico City. This craft market is located in an old colonial building, in the neighborhood of San Angel, where I grew up. It is one of my favorite places in Mexico City!

The folks at Fonda San Angel have been creating elaborate fruit displays on their fountain for more than 20 years. Much like the fish fountain at Harrod's in London, the displays are ever changing - they never look the same. Here is another photo from flickr member Carlitos


Inspired by my memories of this fountain, I recently changed the look of my blog and added a header. I used fruits, vegetables and folk art for my display. I hope you like it!

If you are planning a trip to Mexico City, check out the website for Fonda San Angel and Bazaar de Sabado. It has information on the Bazaar, the restaurant, conventions and the historic town of San Angel.

Tuesday, January 12, 2010

Fragrant "Tejocote" Winter Punch


Last month I was browsing the usual grocery stores on Mission Street when I discovered two of my favorite smelling fruits: Tejocotes and guayabas! I immediately got some and made a warm punch like the ones prepared on the foggy Chiapas highlands. Tejocotes and guayabas are still available. Go ahead and get some, and learn how to make this punch that will help you endure the cold, rainy San Francisco night. Ready? Let's go!


Until very recently, tejocotes were not available in the US. The name is a derivative of the word "Texocotl" meaning stone fruit. They look like miniature pumpkins or apples, and have a sweet, concentrated scent reminiscent of apples and roses. Tejocotes that grown in the US are a lot smaller than the ones grown in Mexico, but the smell is just as sweet. They are not particularly good eaten by themselves, they are a bit mealy, but they are great when used in desserts and drinks. You can also get them in a jar, preserved in syrup, if you can't find fresh ones.

Oh yeah...Did I mentioned tejocotes smell wonderful?? Tejocote smell is a mood enhancer for the winter "sads", and native people used it as a form of aromatherapy. In the old days, devoted Mexicans wore necklaces made out of tejocotes as a "pick me up", on long pilgrimages by foot to spiritual gatherings and festivals. I made a tejocote collar and placed it on a fruit display, on order to keep my apartment smelling fresh.

But on to the punch! There are many recipes for this delicious beverage. The names also vary, some people call it "Ponche de Navidad", or "Ponche de Fiesta", or "Ponche de Tejocote", or simply "Ponche con Piquete" if its spiked. This is my personal recipe, it is not very sweet, and uses several other seasonal fruits. To make it, you'll need the following ingredients:
  • One cup of fresh pineapple or orange juice
  • 1 cup (about 15 small) tejocotes
  • 2 large guayabas, quartered
  • 2 apples of your choice, in eights (I'm using organic Jonagold)
  • 2 sticks of raw sugar cane, peeled and cut in sections
  • A small glass of brandy (optional)
  • 1 cup of nanche in syrup. Also known as "nance", or "nanchi". A type of mealy yellow cherry
  • Two small blood oranges, in slices
  • A pitcher of water
  • One stick of cinnamon
  • Three whole cloves
  • One whole star anise
  • Agave nectar, or raw sugar (piloncillo) to taste
To Garnish:
  • Slices of blood orange
  • Extra nances and tejocotes
  • Thin sticks of raw sugar cane
In a large pot, combine all the ingredients, with the exception of the garnishes and the agave nectar, if using. Bring to a boil and stir occasionally. One the punch starts to boil, lower the heat and simmer for twenty minutes, until the fruit starts to come apart. Correct the sweetness by adding agave nectar and a little bit more brandy, if you wish. Strain and serve in cups, with a sugar cane stick as a stirrer. You can also add more orange, tejocotes and nances to decorate. Makes about 6 cups.

Friday, December 25, 2009

Ensalada de Nochebuena - Christmas Eve Salad


During Mexican Christmas celebrations colorful star shaped piñatas were traditionally filled with citrus fruit, peanuts, small jicamas, sections of sugar cane and colacion, or small pastel colored anise candies. Once the piñatas were smashed open they smell was intoxicating, even if the fruit was a little bruised.

This juicy, crunchy, sweet salad contains some of the same ingredients, and it reminds me of all the smells, colors and tastes of the season. Ensalada de Nochebuena is traditionally served the evening of December the 24th, but you can make it all winter long. To make this salad you'll need the following ingredients:

  • One head of lettuce
  • Two oranges, peeled and cut in sections
  • Once large jicama, shredded (or two small ones)
  • 4 ribs of celery, sliced finely
  • One cup of fresh pineapple, chopped
  • Two medium sized beets, cooked and chopped finely
  • One cup of shredded carrots
  • One stick of raw sugar cane, peeled and chopped in small pieces *(See notes about eating sugar cane at the end of the recipe)

Garnishes:
  • About half a cup of toasted peanuts, or more to taste
  • Cut radish "flowers"
  • Seeds from one large pomegranate
Dressing:
  • 1/4 cup of the water where you boiled the beets
  • 1/4 cup of white vinegar
  • 1/4 cup of orange, lime or pineapple juice
  • 3 tablespoons of sugar

Chop, shred and chill all the ingredients. I use an electric food processor, it cuts things evenly and in less time than chopping manually. Line a large salad bowl with shredded lettuce, arrange the rest of the ingredients on top. I arranged mine in "wedges" like on the photo. Clock wise: Jicama, carrots, pineapple, orange, celery, beets and sugar cane.


Garnish the salad with the peanuts, pomegranate seeds and radishes. Aditionally you can also add anise seeds, and crushed colacion candy. Toss right before you are ready to eat. To make the dressing, combine all the ingredients in a cruet and chill well. Serve the dressing on the side, or the salad will get soggy.


*Notes about eating sugar cane:
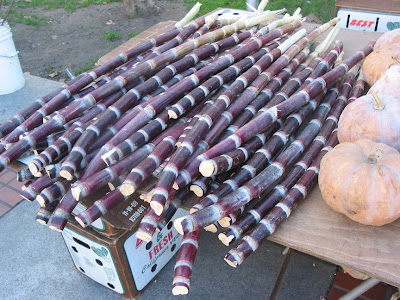


* How to eat? Raw sugar cane is very juicy and sweet, but it is also very fiberous. It is perfectly fine to chew out all the juicy goodness and spit out the woody, fiberous part. If you are having a fancy affair and you don't want to see your guests spitting, just omit the sugar cane from your salad. Supervise children when eating raw sugar cane. Don't cut into pieces that are too big, they could be dangerous if not chewed properly.

Where to buy? You can buy raw sugar cane at the farmer's market. It looks like a long stak of bamboo (see the picture above). You'll need to peel it and cut it down to smaller pieces. Here is a link for instructions for peeling and eating a raw sugar cane stick. Even better, you can also buy the cane already in sections, with the tough husks removed, at some Asian and Latino food markets. The come conveniently sealed in little plastic baggies.

Felices Fiestas!

Thursday, December 24, 2009

Ornaments: Using Crepe Paper Rosettes

Some of my ornament kits include crepe paper rosettes. You can create some of your own, just follow these instructions. First, cut crepe paper ribbons that are about 15 inches long and about 2 - 3 inches wide. Make sure the grain of the paper runs vertically. Using needle and thread start sewing a running stich along one side of the paper ribbon.


Start gathering the paper by pulling the thread gently. Create a pleaded "fan" out of the crepe paper, then shape into a circle. Overlap the edges and secure with a droplet of glue, and sew the center together.


You'll have a nice fluffy crepe paper disk ready to decorate. You can create your rosettes in a variety of sizes by cutting the paper ribbons in widths that are gradually smaller.


Now, here comes the fun part - decorating them. You can also leave them "as is" and stack several rosettes on top of each other, they make a nice decoration for a wrapped gift.


To add extra sparkle you dip the edges or your rosette in glue and then in fine glitter. Let them dry for several hours before handling.


If you want to hang your ornament you can staple a piece of ribbon to the back of the rosette. You can also build your ornament by layering the rosette with a painted wood chip, embossed rubber stamped cut-outs, collage elements, charms and other embellishments. Here are some ideas, have fun.

Saturday, December 5, 2009

New Workshop: Guadalupe Holiday Ornaments


Guadalupe-inspired "Adornitos"
Saturday, December 12, 2009
3:00 to 8:00 pm
Galeria de la Raza, Studio 24th
2857 24th Street

San Francisco, CA

Create a Virgen de Guadalupe ornament, or your own interpretation of her: An Aztec warrior Goddess, a personification of winter, or a homage to Latina power and mystique. No sign-in necessary, just make your creation and take it home, ready to hang any place that needs a little sacred-ness. Only $7.00! We'll have lots of clip art, crepe paper, glitter, plaster add-ons and other precious embellishments available.

Estrellitas: Making Cardboard Stars


Some of my Holiday Ornament Kits provide glittery stars. With some patience and practice you can make some of your own. You'll need the following materials:

  • Recycled light weight cardboard
  • Scissors
  • Xacto knife
  • Ruler
  • Sticky glue
  • Acrylic paint
  • Fine glitter
  • Wire or ribbon
  • Trimmings of your choice
First, cut out two identical five point stars. You can dowload and print the pattern below courtesy of Math Central. They also have instructions for another 3D cardboard star , those instructions work better if you want to make a much larger star, by creating each point separately. They even provide the mathematical equation!


In this case, I use thin recycled cardboard to cut out two identical stars. The material used to make cereal boxes is perfect. To give the stars 3D points use a dull xacto knife and score the points of the cardboar star from the point to the opposite side (it will be a line that divides the star in two). Make sure you don't cut the cardboard all the way trough. Repeat on all five sides. If you are doing this correcty all cuts will intersect in the middle of the star. Fold and crease the star creating hills and valleys, using the scored guides. Next, repeat with the other star.


All you have to do now is glue the two stars back to back, to create a tridimentional star. If you wish, add a cord, ribbon or wire for hanging before gluing them together. Decorate as you wish. Here I'm adding glitter. First, paint the star in a flat color, then cover the entire surface with fine glitter in a similar color and let it dry completely before removing the excess.


Finish your design by adding crepe paper and other collage elements!

Friday, December 4, 2009

"Adornitos" - Holiday Ornament Kits


Las Posadas, or "Inns" are traditional Mexican Christmas gatherings. These parties are very colorful. Pinks, turqoise, charteuse and Rosa Mexicano (fucsia) are prevalent in decorations for a Posada. Decorations like piñatas, papel picado and paper lanterns called farolitos inspired me to design '"Adornitos", or holiday ornament kits. A base, cord, crepe paper, sequins, and other collage elements are included inside each baggy.

You'll have lots of fun designing the composition of your ornament and adding the trimmings. Additionally you can use materials you already have at home - wine corks, packing twine, recycled cardstock, paper doilies, etc. This season I will be posting some ideas and variations for the ornaments you can make. Enjoy!


You can also buy my kits at the Galeria de la Raza's Holiday Bazaar: Crucero Artero Navideño.