Friday, December 25, 2009

Ensalada de Nochebuena - Christmas Eve Salad


During Mexican Christmas celebrations colorful star shaped piñatas were traditionally filled with citrus fruit, peanuts, small jicamas, sections of sugar cane and colacion, or small pastel colored anise candies. Once the piñatas were smashed open they smell was intoxicating, even if the fruit was a little bruised.

This juicy, crunchy, sweet salad contains some of the same ingredients, and it reminds me of all the smells, colors and tastes of the season. Ensalada de Nochebuena is traditionally served the evening of December the 24th, but you can make it all winter long. To make this salad you'll need the following ingredients:

  • One head of lettuce
  • Two oranges, peeled and cut in sections
  • Once large jicama, shredded (or two small ones)
  • 4 ribs of celery, sliced finely
  • One cup of fresh pineapple, chopped
  • Two medium sized beets, cooked and chopped finely
  • One cup of shredded carrots
  • One stick of raw sugar cane, peeled and chopped in small pieces *(See notes about eating sugar cane at the end of the recipe)

Garnishes:
  • About half a cup of toasted peanuts, or more to taste
  • Cut radish "flowers"
  • Seeds from one large pomegranate
Dressing:
  • 1/4 cup of the water where you boiled the beets
  • 1/4 cup of white vinegar
  • 1/4 cup of orange, lime or pineapple juice
  • 3 tablespoons of sugar

Chop, shred and chill all the ingredients. I use an electric food processor, it cuts things evenly and in less time than chopping manually. Line a large salad bowl with shredded lettuce, arrange the rest of the ingredients on top. I arranged mine in "wedges" like on the photo. Clock wise: Jicama, carrots, pineapple, orange, celery, beets and sugar cane.


Garnish the salad with the peanuts, pomegranate seeds and radishes. Aditionally you can also add anise seeds, and crushed colacion candy. Toss right before you are ready to eat. To make the dressing, combine all the ingredients in a cruet and chill well. Serve the dressing on the side, or the salad will get soggy.


*Notes about eating sugar cane:
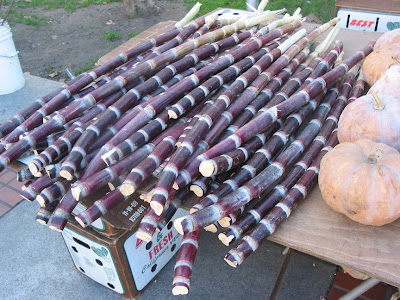


* How to eat? Raw sugar cane is very juicy and sweet, but it is also very fiberous. It is perfectly fine to chew out all the juicy goodness and spit out the woody, fiberous part. If you are having a fancy affair and you don't want to see your guests spitting, just omit the sugar cane from your salad. Supervise children when eating raw sugar cane. Don't cut into pieces that are too big, they could be dangerous if not chewed properly.

Where to buy? You can buy raw sugar cane at the farmer's market. It looks like a long stak of bamboo (see the picture above). You'll need to peel it and cut it down to smaller pieces. Here is a link for instructions for peeling and eating a raw sugar cane stick. Even better, you can also buy the cane already in sections, with the tough husks removed, at some Asian and Latino food markets. The come conveniently sealed in little plastic baggies.

Felices Fiestas!

Thursday, December 24, 2009

Ornaments: Using Crepe Paper Rosettes

Some of my ornament kits include crepe paper rosettes. You can create some of your own, just follow these instructions. First, cut crepe paper ribbons that are about 15 inches long and about 2 - 3 inches wide. Make sure the grain of the paper runs vertically. Using needle and thread start sewing a running stich along one side of the paper ribbon.


Start gathering the paper by pulling the thread gently. Create a pleaded "fan" out of the crepe paper, then shape into a circle. Overlap the edges and secure with a droplet of glue, and sew the center together.


You'll have a nice fluffy crepe paper disk ready to decorate. You can create your rosettes in a variety of sizes by cutting the paper ribbons in widths that are gradually smaller.


Now, here comes the fun part - decorating them. You can also leave them "as is" and stack several rosettes on top of each other, they make a nice decoration for a wrapped gift.


To add extra sparkle you dip the edges or your rosette in glue and then in fine glitter. Let them dry for several hours before handling.


If you want to hang your ornament you can staple a piece of ribbon to the back of the rosette. You can also build your ornament by layering the rosette with a painted wood chip, embossed rubber stamped cut-outs, collage elements, charms and other embellishments. Here are some ideas, have fun.

Saturday, December 5, 2009

New Workshop: Guadalupe Holiday Ornaments


Guadalupe-inspired "Adornitos"
Saturday, December 12, 2009
3:00 to 8:00 pm
Galeria de la Raza, Studio 24th
2857 24th Street

San Francisco, CA

Create a Virgen de Guadalupe ornament, or your own interpretation of her: An Aztec warrior Goddess, a personification of winter, or a homage to Latina power and mystique. No sign-in necessary, just make your creation and take it home, ready to hang any place that needs a little sacred-ness. Only $7.00! We'll have lots of clip art, crepe paper, glitter, plaster add-ons and other precious embellishments available.

Estrellitas: Making Cardboard Stars


Some of my Holiday Ornament Kits provide glittery stars. With some patience and practice you can make some of your own. You'll need the following materials:

  • Recycled light weight cardboard
  • Scissors
  • Xacto knife
  • Ruler
  • Sticky glue
  • Acrylic paint
  • Fine glitter
  • Wire or ribbon
  • Trimmings of your choice
First, cut out two identical five point stars. You can dowload and print the pattern below courtesy of Math Central. They also have instructions for another 3D cardboard star , those instructions work better if you want to make a much larger star, by creating each point separately. They even provide the mathematical equation!


In this case, I use thin recycled cardboard to cut out two identical stars. The material used to make cereal boxes is perfect. To give the stars 3D points use a dull xacto knife and score the points of the cardboar star from the point to the opposite side (it will be a line that divides the star in two). Make sure you don't cut the cardboard all the way trough. Repeat on all five sides. If you are doing this correcty all cuts will intersect in the middle of the star. Fold and crease the star creating hills and valleys, using the scored guides. Next, repeat with the other star.


All you have to do now is glue the two stars back to back, to create a tridimentional star. If you wish, add a cord, ribbon or wire for hanging before gluing them together. Decorate as you wish. Here I'm adding glitter. First, paint the star in a flat color, then cover the entire surface with fine glitter in a similar color and let it dry completely before removing the excess.


Finish your design by adding crepe paper and other collage elements!

Friday, December 4, 2009

"Adornitos" - Holiday Ornament Kits


Las Posadas, or "Inns" are traditional Mexican Christmas gatherings. These parties are very colorful. Pinks, turqoise, charteuse and Rosa Mexicano (fucsia) are prevalent in decorations for a Posada. Decorations like piñatas, papel picado and paper lanterns called farolitos inspired me to design '"Adornitos", or holiday ornament kits. A base, cord, crepe paper, sequins, and other collage elements are included inside each baggy.

You'll have lots of fun designing the composition of your ornament and adding the trimmings. Additionally you can use materials you already have at home - wine corks, packing twine, recycled cardstock, paper doilies, etc. This season I will be posting some ideas and variations for the ornaments you can make. Enjoy!


You can also buy my kits at the Galeria de la Raza's Holiday Bazaar: Crucero Artero Navideño.

Wednesday, November 25, 2009

Winter Squash in Green "Pipian" Sauce

Calabaza en Pipián Verde

Versions of this Mexican recipe go back to pre-hispanic times. Pipian is similar to the popular Mole sauce but it contains fewer ingredients. This sauce is also known as pepián, and one of its ingredients is pumpkin seeds, also known as pepitas. Just like Mole, this sauce comes in a variety of colors: Pipian colorado (a red sauce), pipian amarillo (a pale yellow sauce) and the recipe I'm sharing today, pipian verde. I think this is a wonderful warm vegan recipe, you can even serve it for thanksgiving. You'll need the following ingredients:

  • 2 cups vegetable stock
  • About a pound of small fresh tomatillos, or
  • a 16 ounce can of crushed tomatillos
  • 1 medium onion
  • 1 clove of garlic
  • 1 serrano chile, or more to taste
  • 1 cup of fresh cilantro
  • Your choice of squash, 2 medium. I use carnival and acorn squash.
  • 1 cup unsalted pepitas (shelled pumkins seeds)
  • About two tablespoons of vegetable oil
  • Salt and white pepper to taste
  • Toasted pumpkin seeds and chopped cilantro, to garnish

Cut the squash in half. Roast in a shallow pan with a little bit of vegetable oil in a hot 375 degree oven. The squash halves will be done when its easy to pierce them with a fork, usually about 30 to 40 minutes, depending on the size of the squash.

The squash will be slightly caramelized when its ready. Remove the fibers and scoop out the seeds with a spoon. Cut into bite size sections and remove the peel with a sharp knife. Set aside.


Boil the the tomatillos, the onion, the garlic and the serrano chile in a cup of vegetable stock. When the tomatillo mixture is very soft (about 10 minutes), set aside and let it cool.

Ground the pepitas in a blender until you obtain a fine powder. The finer the powder, the smoother your sauce will be. Make sure you don't add any liquid. Pulverizing the dry seeds makes the sauce delicate and nutty, adding liquid changes the flavor. Set aside for later.

Blend the tomatillo mixture and the fresh cilantro and another cup of the vegetable stock in a blender, until you have a smooth sauce, similar to "salsa verde". Transfer to a sauce pan and start cooking under low heat. Add the pumkin seed powder and stir often, add salt and white pepper to taste.

As the broth reduces the sauce will begin to thicken to the consistency of heavy cream. Add the squash sections and simmer under very low heat for about ten more minutes. Don't let it scorch. Add a little bit more stock if necessary.

Correct the seasonings. Serve with white rice, warm corn tortillas or cornbread. Garnish with extra toasted pumpkin seeds and chopped cilantro.

Tuesday, November 24, 2009

Pachanga Thanks

Thank you to all the staff and volunteers from Galeria de la Raza for a sucessful art auction event - Pachanga 2009! On Saturday, November the 21st, 2009 the auction raided funds for programming at Galeria, and it is the only Latino art event in San Francisco of its kind. Here are some photos from the auction.


Auctioneer Durwood Zedd and Executive director Carolina Ponce de Leon
keep up with high bidders.


Hey! That is my art piece, "La Casita/My Little Foreclosure", it went to the highest bidder for over $300!

Great art was auctioned

The lovely Jessica Diaz, from Gracias Madre. They provided tasty organic vegan tamales.

For more photos, check out this article by Vanessa Carr for Mission Local

Tuesday, November 17, 2009

Charity Fundraiser, Faux Gingerbread & Dark Fairy Tales


We all know the tale; and evil witch lures innocent children using candy, in order to eat them. According to Anke A. Culver, a retired professor of Loyola University, the witch is the one that got a bad rap. The witch’s name was Katharina Schraderin, a talented baker from Southern Germany in the 1600’s. A baker named Hans Metzler tried courting Katharina in order to steal her recipes. After being rejected he accused her of practicing witchcraft. Katharina is found innocent, but the greedy Hans and his sister Grete end up breaking into her house. They ruthlessly kill Katharina and burn her remains in one of her ovens. Talk about killing the competition!


I created this shadowbox house out of wood and a variety of media. It is being auctioned for Galeria de la Raza's annual fundraiser, on Saturday, November 21st. The lightbox is shaped like a gingerbread house, complete with a bedroom, a bathroom, a living room, a walk-in closet, a kitchen and a porch. Two little characters seem to live inside, will they live happy ever after? The title of the piece is "La Casita/My Little Foreclosure".


These days seems like people are loosing their little piece of the American dream, for a variety of reasons. What, or who is to blame? Immigrants? Banks? People that got loans they couldn’t pay? Could it be illness, a divorce, a death in the family, the loss of a job? Are the victims, once again, being blamed?


Please support Galeria de la Raza’s Pachanga! Visit the on-line catalog for more information and suggested starting bids. Bidding by proxy is allowed and encouraged.

Visit Cookie Cutter Research, to read more about the story behind the tale of Hansel and Gretel, as told by professor Culver. The website also has a great on-line database of cookie cutters, as well as everything related to cookies.

Monday, November 16, 2009

Pachanga: Support the 9th Annual Art Auction


Galería's annual art auction is just around the corner. Pachanga! Is Galeria de la Raza's annual benefit celebration with a live and silent auctions. I'm honored to be a part of this event once again. San Francisco's only Latino art party takes place on Saturday, November 21st from 7 - 10 pm. Dance to the beats provided by DJ Chango Julius. $20 - $50 sliding scale. Raffle items include a pair of R/T tickets to anywhere in the US, among other goodies.

Silent Auction: 7:00 pm - 9:30 pm.

Live Auction: 8:00pm

Auctioneer: Durwood Zedd

Food & drink provided by Venga Empanadas, Cafe Gratitude/Gracias Madre, Frey Vineyards, Sugar Lump, Rainbow Grocery Co-op and others.

Go to Galeria de la Raza to privew the Pachanga 2009 artist catalog!

Monday, November 2, 2009

Papas con Rajas - Goodies for the Day of The Dead


Yesterday I made some goodies for a family function conmemorating The Day of The Dead (El Dia de Los Muertos), or "Los Fieles Difuntos" as this holiday is known in some areas of Mexico. This is a photo of the ofrenda created by my cousin, the gracious hostess for this gathering (gracias,Hildi). The ofrenda was made in honor of her father, grandparents and deceased cousins.

I made some empanadas de papas con rajas (potato and roasted pepper empanadas), classic guacamole and a refreshing citrus pico de gallo. Today I'm sharing my recipe for the empanada stuffing. Poblano peppers are spicy, but you can use any other pepper you prefer. This filling can be used for tacos, it is great as a tostada topping, and can be used as a side dish by itself. You'll need the following ingredients:

Papas con rajas
  • 2 large poblano chiles
  • one small white onion, slivered
  • 3 white potatoes, boiled, peeled and cubed
  • one clove of garlic
  • Olive oil, about two table spoons
  • Vegetable broth, or water where you boiled the potatoes. About a quarter of a cup.


Start by making roasted poblano peppers. I roast mine directly on the stove top, but you can also use an outdoor grill. Wash and dry your peppers and place them on the open flame. Using thongs, turn them over often, until the skin is evenly black on all sides. Don't worry about burning the peppers, the inside will remain green and juicy.


Wrap the peppers with a lightly damped towel, a paper towel works fine. Place the wrapped peppers inside a plastic bag and let them "sweat" for about fifteen minutes. Once the peppers are soft and steamed, the skin will fall right off - just take a spoon and start scraping off the charred skin. In order to retain the roasted flavor, wipe the peppers with the moist towel but don't rinse them under water. It is OK if a few black bits and seeds remain behind, they will add flavor.


Cut the peppers in "rajas", or slivers. Cut the top of the peppers off, and slice them lenghtwise. Scrape off the seeds and the veins using a small paring knife, they contain most of the spiciness (I usually do this directly on top of the trash can). You now have roasted pepper "sheets" ready to use. To make the rajas just stack the peppers on top of each other and cut into thin slivers.


Sautee the onions, the chopped garlic and the peppers in olive oil until the onion looks translucent. Add the cooked, cubed potatoes. Sautee for about 5 minutes more on high heat until the potatoes begin to brown. Season with salt and deglaze the pan by adding about a quarter of a cup of broth and cover. Cook for about two more minutes until the liquid is absorved and the potatoes are very soft. They are now ready to serve.

Enjoy some good food with family and friends, and remember your deceased loved ones. Have a great holiday!

Friday, October 30, 2009

Cajitas: Great Workshop!

On Saturday, October 24th I lead a Day of the Dead workshop at Galeria de la Raza. I provided participants with small postcard sized wooden boxes and a variety of embellishments that included plaster miniatures, specialty papers and other collage elements.

It was really a joy seeing friends and families working together!

Everyone was working so hard...But it seems like they were also having a good time

The themes of the boxes varied from traditional Day of the Dead designs to personal dedications to family members to a fantastic box with an environmental theme, in honor of our dying planet. Thanks everyone for participating!


And thank you Galeria de la Raza! Click the link to visit Galeria's calendar of events

Monday, October 26, 2009

Chile Wreaths and Etymology


I was in Seattle recently for work and I got a chance to eat lunch at the famous Pike Place Market. After walking around I made my way to Post Alley and El Mercado Latino. This is rainy Seattle not New Mexico so I was surprised to see many gorgeous chile ristras and wreaths in so many shapes and colors! I took some photos for your enjoyment. All these chiles inspired me to write on the origins of the word "chile".


Chile or Pepper?
Christopher Columbus was the first European to encounter plants from the genus Capsicum in the Americas. In Spanish these plants came to be known as chiles (from their original Nahuatl name, chil). Columbus tried to pass these plants as the same spice known to Europeans as pepper. At the time pepper was highly priced in Europe, known as a spice, a preservative and a medicine. Black pepper (Piper Nigrum) is however from the family Piperacea, a spice native of South India. Columbus may have thought Capsicum and Piperacea were the same, since confused Europeans believed to be in India when the "new" word was first "discovered". This is the reason Native Americans are erroneously called "Indians", and why in English we are stuck with the same word (pepper) for two different plants.


Chile or Ají?
The South American country of Chile is long and skinny...but it is NOT named after a chile.
The name of the country has different roots than those of the chile pepper, originating from the Quechua chilli, a combination of the words "Chi", meaning trascendental and "Levu" (shortened to "Le"), meaning river. Loosely translated it means "The River of the Ancestors". Curiously, in South America the Spanish word for hot pepper is Ají picante, as opposed to chile, as it is known in Mexico and other North American Spanish speaking countries. However in all Spanish speaking countries black pepper is called pimienta a word similar to the Spanish word for bell pepper: Pimiento.


Chili or Chile?
"Chili" is the anglicisation of the word Chile, and it is used only in the US. It is also the name of the popular Chili stew made with meat, chiles and some times beans. The dish has its roots on food eaten in Mexico for centuries, basically meat seasoned with chiles, or "carne con chile", by its name in Spanish (literally it means "meat with chiles"). In the American Southwest the name of the dish (and the dish itself) went trough a reincarnation and became "Chili con Carne", or the powdered spice blend used to season this dish. The good folks of ChileTraditions mention that in 1983 New Mexico Senator Pete Dominici made an official congressional record on the correct way of spelling Chili: With an "E" at the end.


More fastidious chile grammar and slang
English speaking folks usually say "chile rellenos" or simply "rellenos" when referring to the dish consisting of battered stuffed peppers. The plural of the Spanish word would be "ChileS rellenos", if there is more than one.

So, rellenos or not, how HOT are chiles really? The chemical called capsaicin in the chile stimulates the papillary glands and dermis and produces a "burning" sensation, and make you release endorphins, creating a reaction similar to heat exposure. The chile itself doesn't produce heat. Eating chiles while in the middle of a snowstorm won't save you from hypothermia.

The spiciest chile is probably the Habanero. It is spelled HabaNero, not Habañero, since it is named after the city of La Habana, where the chile was traded. The origin of this chile, however, was the Yucatan peninsula and it is featured in many delicious Yucatecan recipes.

In Spanish when something is spicy it is called "picante", from the word "picar", meaning something that pierces like a needle or stings like a mosquito. In Mexico the word chile also has sexual connotations, it alludes to the penis.

So my friends...Al Chile (A slang saying, meaning: To the point!)

If you go to Mexico don't ask for chile "caliente", if you are expecting something spicy - you'll just get something warm. If you are a guy, don't ask for someone to heat your chile, unless you are expecting...Oh, never mind. If you go to Seattle, make sure you visit Pike Place Market.

Happy eating!